
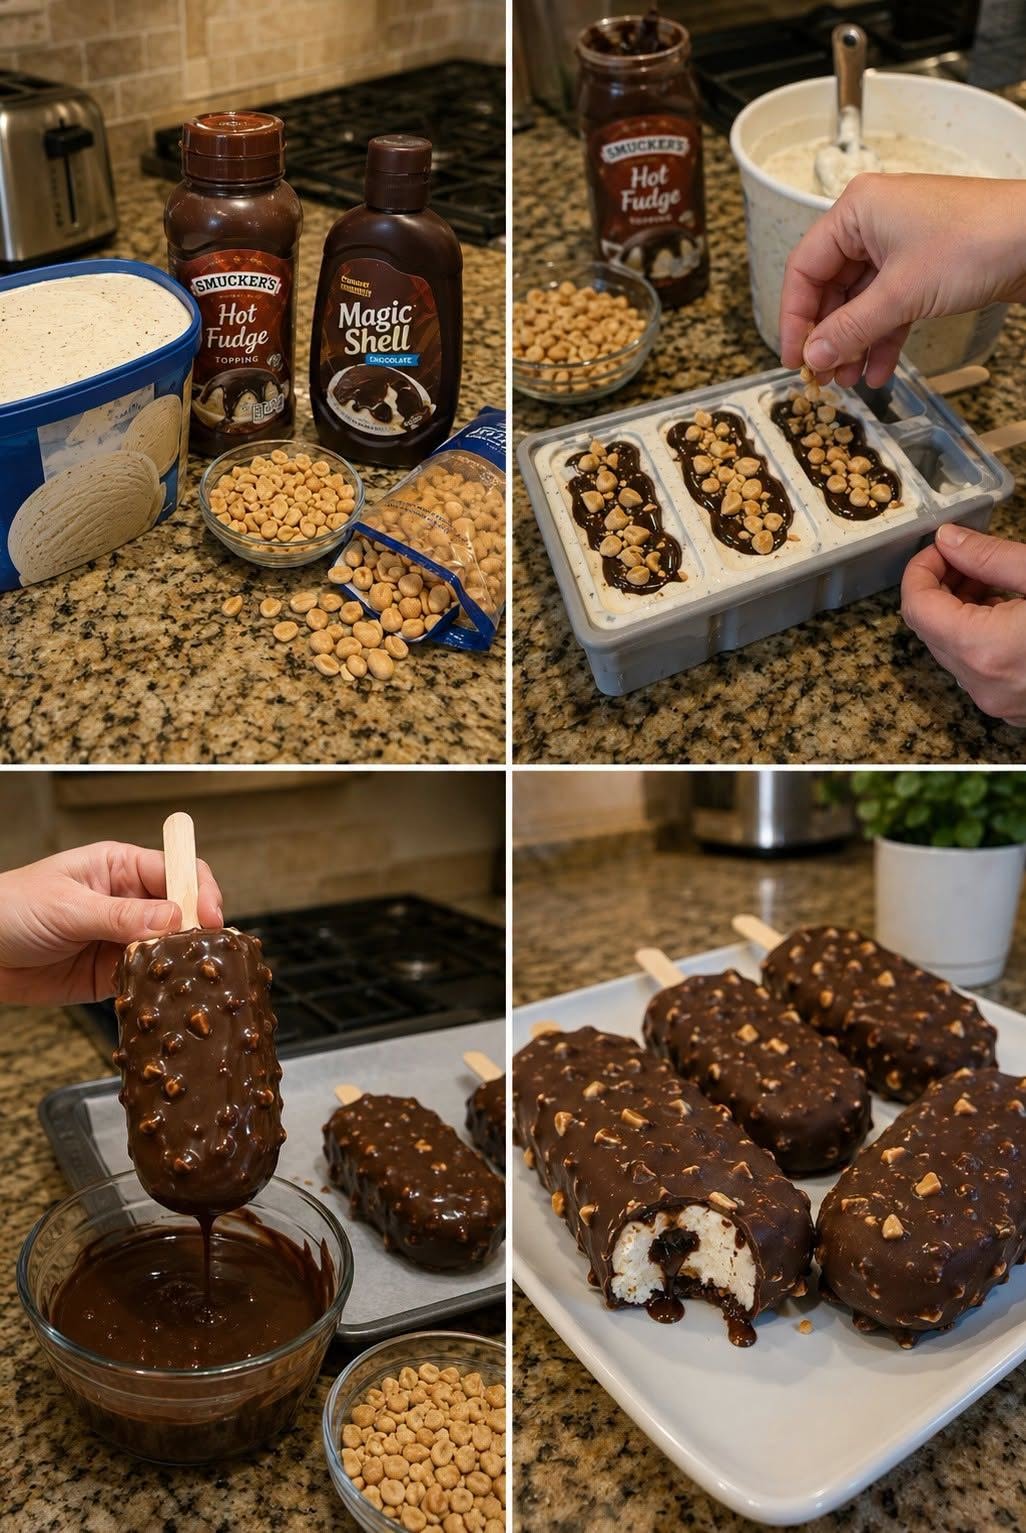
Vanilla ice cream is the classic base for this dessert because it lets the chocolate fudge and peanuts stand out. Letting the ice cream soften slightly before layering makes it much easier to spread into molds or a pan.
Hot fudge is one of the key parts of a true buster bar style dessert. It adds rich chocolate flavor and gives the bars those soft fudgy layers between the ice cream.
Salted peanuts add the signature crunch and balance the sweetness really well. The little bit of salt makes the chocolate and vanilla flavors even better.
Chocolate chips or melting wafers create the outer shell. Adding a little coconut oil or shortening can help make the melted chocolate smoother and easier to coat.
How to Make
1. Prepare the molds or pan
Set out popsicle molds or line a small pan or loaf pan with parchment paper.
This makes the bars easier to remove once frozen and keeps the process less messy.
2. Soften the ice cream slightly
Let the vanilla ice cream sit for a few minutes until it is soft enough to spread.
You do not want it melted, just softened enough to work with easily.
3. Add the first ice cream layer
Spoon a layer of softened vanilla ice cream into the molds or pan.
Spread it evenly and press it down gently so the base is smooth.
4. Add the hot fudge
Spoon a layer of hot fudge over the ice cream.
Try to spread it evenly, but do not worry if it is not perfect. Once frozen, the layers look great.
5. Add the peanuts
Sprinkle a generous layer of salted peanuts over the fudge.
This gives the bars their signature crunch and that classic buster bar texture.
6. Repeat the layers
Add more vanilla ice cream, then another layer of hot fudge, and more peanuts if you want a fuller layered bar.
Smooth the top as evenly as you can.
7. Freeze until firm
Place the bars in the freezer until completely firm.
This is important because the chocolate shell works best when the bars are very cold and solid.
8. Melt the chocolate
Melt the chocolate chips or wafers gently until smooth.
If using coconut oil or shortening, stir a little in to make the chocolate easier to coat or drizzle.
9. Coat or top with chocolate
If using molds or bars on sticks, dip the frozen bars into the melted chocolate.
If using a pan version, pour or spread the melted chocolate over the top as a shell layer.
10. Freeze again and serve
Return the bars to the freezer until the chocolate is fully set.
Serve straight from the freezer for the best creamy and crunchy texture.
Tips for Best Results
Let the ice cream soften only slightly. If it gets too melted, the layers can become messy and freeze less evenly.
Freeze the bars very well before adding the chocolate shell. A firm frozen bar helps the coating set faster and stay neater.
Use hot fudge that is thick enough to layer well. Very thin fudge can mix into the ice cream too much.
Line the pan or use molds that release easily. Frozen layered desserts are much easier to handle when the pan is prepared well.
Work quickly when adding the chocolate coating so the bars stay very cold.
Keep the finished bars in the freezer until right before serving since they soften quickly once out.
Variations / Substitutions
These Dairy Queen Copycat Buster Bars are easy to customize.
Use chocolate ice cream instead of vanilla
Add caramel between the layers
Use chopped almonds or pecans instead of peanuts
Add crushed cookies for extra crunch
Use peanut butter drizzle for extra richness
Make them in cupcake liners for mini versions
Add whipped topping for a lighter layer
Use dark chocolate for a richer shell
What to Serve With It
These frozen bars are great on their own, but they also go well with:
Summer dessert tables
Fresh fruit
Ice cream party spreads
Birthday treats
Brownies
Cookies
Cold coffee drinks
Milkshakes
They are especially fun for summer parties, cookouts, and freezer dessert trays.
Storage and Reheating
Freezer: Store in an airtight container in the freezer for up to 2 weeks
Best served: Straight from the freezer
Do not reheat: This is a frozen dessert
Best tip: Separate layers with parchment paper if stacking
These bars are made for freezer storage, which makes them great for make-ahead desserts.
Common Mistakes to Avoid
One common mistake is not freezing the bars long enough before adding the chocolate. A firm frozen bar is much easier to coat cleanly.
Another is letting the ice cream melt too much during layering. Slightly softened works best.
Using too little peanut layer can also change the texture, since the crunch is one of the most important parts of this dessert.
Finally, trying to serve them too late after removing from the freezer can make them softer and messier than intended.
FAQ
What are Dairy Queen Copycat Buster Bars?
They are homemade frozen dessert bars inspired by Dairy Queen’s buster bars, usually made with vanilla ice cream, fudge, peanuts, and chocolate coating.
Can I make Dairy Queen Copycat Buster Bars ahead of time?
Yes, they are perfect for making ahead because they are stored in the freezer.
Do I need molds?
No, you can also make them in a lined pan and cut them into bars later.
What kind of nuts work best?
Salted peanuts are the classic choice, but other nuts can work too.
Can I use store-bought hot fudge?
Yes, store-bought hot fudge works very well and keeps the recipe easy.
Can I make mini versions?
Yes, mini molds or cupcake liners work great for smaller individual treats.
How long do they last in the freezer?
They are best within about 2 weeks for the best texture and flavor.
Can I use dark chocolate?
Yes, dark chocolate works well if you want a richer outer shell.
Conclusion
These Dairy Queen Copycat Buster Bars are creamy, crunchy, chocolaty, and full of the nostalgic flavor that makes them such a fun frozen treat. The layers of vanilla ice cream, hot fudge, peanuts, and chocolate shell come together into a dessert that feels classic, satisfying, and perfect for warm-weather cravings.
They are easy to make ahead, easy to customize, and always a fun addition to parties or summer dessert menus. If you want a homemade frozen dessert that feels familiar and extra delicious, this one is definitely worth making.
To see the full cooking instructions, go to the next page or click the Open button (>) and don't forget to SHARE it with your friends on Facebook.