

Step-by-Step Instructions
Step 1 — Activate the Yeast
Begin by waking up the yeast. Pour the warm water into a small bowl — it should feel comfortably warm against your wrist, similar to bathwater. Too cold and the yeast won’t activate; too hot and you’ll kill it. Add the dry yeast and stir gently, then let the mixture rest for about 5 minutes undisturbed. Within that time you should see bubbles forming and a slight frothy layer developing on the surface. That foam is a sign the yeast is alive and ready. If nothing happens after 5 minutes, your water was likely too hot or the yeast has expired — start fresh before proceeding.
Step 2 — Mix the Dough
In a large bowl, combine the flour and salt and stir briefly to distribute the salt evenly. Create a well in the center and pour in the olive oil followed by the activated yeast mixture. Using a wooden spoon or your hands, bring the ingredients together until a rough, shaggy dough begins to form. If the dough feels excessively sticky and is clinging to everything, add a small amount of flour — a tablespoon at a time — until it comes together into a workable mass. Avoid the temptation to add too much flour too quickly; a slightly tacky dough is far better than a dry one.
Step 3 — Knead the Dough
Turn the dough out onto a clean, lightly floured surface and begin kneading. Push the dough away from you with the heel of your hand, fold it back toward you, rotate it a quarter turn, and repeat. Keep this rhythm going for 8 to 10 minutes. What you’re doing during this process is developing the gluten network — the elastic structure that gives bread its texture and allows it to trap the air bubbles produced by the yeast. As you knead, the dough will gradually transform from rough and uneven to smooth, supple, and elastic. It should feel like soft leather when it’s ready, springing back gently when you poke it with a finger.
Step 4 — First Rise
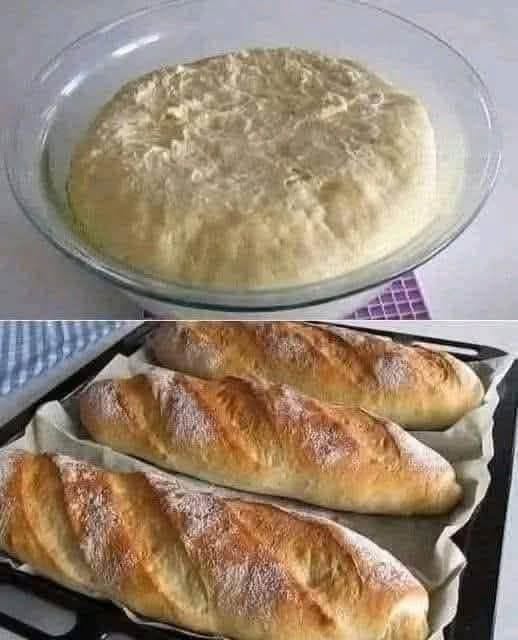
Shape the kneaded dough into a ball and place it into a clean bowl that’s been lightly coated with a small amount of olive oil. Turn the dough once to coat the surface and prevent it from drying out. Cover the bowl loosely with a clean kitchen towel or a piece of plastic wrap and set it in a warm, draft-free spot. Let the dough rise for about 1 hour, or until it has roughly doubled in size. A turned-off oven with just the light on, or a warm spot near your stovetop, works well. This first rise — called the bulk fermentation — is where the yeast produces the carbon dioxide gas that will make your bread light and airy.
Step 5 — Shape the Dough
Once the dough has doubled, gently press your fist into the center to release the built-up gas. This is called “punching down” the dough, and it’s a satisfying step. Turn the dough out onto a lightly floured surface and shape it into your desired form — either a classic oval freeform loaf or a more uniform shape if you’re using a loaf pan. Handle the dough gently at this stage; you want to degas it just enough to shape it without working all the structure out of it.
Step 6 — Second Rise
Place the shaped loaf onto a greased baking sheet or into a greased 9×5-inch loaf pan. Cover it loosely with a towel and allow it to rise for another 30 to 45 minutes. This second, shorter rise — called proofing — gives the dough one final opportunity to puff up and develop an even lighter interior texture. Don’t skip it. The difference between a properly proofed loaf and one that goes straight into the oven is noticeable in both height and crumb.
Step 7 — Bake
While the dough completes its second rise, preheat your oven to 375°F (190°C). Once the loaf has finished proofing, brush the top gently with a light coating of olive oil using a pastry brush or your fingertips — this encourages a beautiful golden color and adds a hint of richness to the crust. Slide the loaf into the center of the oven and bake for 25 to 30 minutes. The bread is done when the top is deep golden brown and the loaf sounds hollow when you tap the bottom firmly with your knuckle. That hollow sound tells you the interior is fully baked through.
Step 8 — Cool Before Slicing
Transfer the bread to a wire rack and resist the urge to cut into it immediately. Let it cool for at least 15 minutes before slicing. This resting period is more important than it sounds — the interior of the bread is still finishing its set as steam redistributes inside the loaf. Cutting into it too soon releases that steam all at once and can result in a gummy, slightly doughy interior. After 15 minutes, the crumb will be fully set and the texture exactly as it should be. Slice and serve warm with good butter.
Why Make Bread at Home?
Freshness and Flavor That Store-Bought Can’t Match
Homemade bread is in a completely different category from anything packaged. Commercial breads are formulated to last on shelves and typically rely on a range of preservatives and additives to maintain that shelf life. When you bake your own, every ingredient is something you chose to put in, and the result is a loaf with a clean, honest flavor that tastes unmistakably fresh. The olive oil in this recipe adds a subtle richness and a slightly tender crumb that makes plain slices genuinely enjoyable on their own.
Fully Customizable
Once you’re comfortable with the base recipe, the possibilities for variation are nearly endless. Fold in fresh or dried herbs — rosemary, thyme, or oregano work beautifully. Add seeds to the dough or scatter them on top before baking. Mix in sun-dried tomatoes, olives, or roasted garlic for something more savory. Or try substituting a portion of the plain flour with whole wheat flour for a heartier, more nutritious loaf. The base technique remains the same; only the character of the bread changes.
Genuinely Cost-Effective
The five ingredients in this recipe are among the most affordable items you can buy. A single batch makes a full loaf that would cost several times more if purchased as an artisan bread from a bakery. For households that go through bread regularly, baking your own even a couple of times a week adds up to meaningful savings over time.
A Healthier Choice
Baking at home means you have complete control over what goes into your bread. No hidden salts, no stabilizers, no emulsifiers — just flour, yeast, water, salt, and olive oil. If you want to improve the nutritional profile further, swapping some or all of the plain flour for whole wheat flour adds fiber, minerals, and a deeper, nuttier flavor. You can also reduce the salt or adjust the olive oil to suit your preferences, something you simply can’t do with a packaged loaf.
Tips for Baking Better Bread
Consider Using Bread Flour
Plain (all-purpose) flour works perfectly well in this recipe and produces a lovely loaf. However, bread flour has a slightly higher protein content, which encourages stronger gluten development during kneading. The result is a chewier, more elastic crumb with a bit more structure — the kind of texture you’d associate with a bakery-style loaf. If you want to experiment, try bread flour the next time you make this recipe and compare the results side by side.
Don’t Rush the Rise
Bread-making rewards patience above almost any other quality. Yeast works at its own pace, and trying to accelerate either the first or second rise by placing the dough somewhere too warm can lead to uneven fermentation and off flavors. If anything, a slightly cooler environment and a longer rise produces more flavor. If you have the time, you can even do the first rise in the refrigerator overnight — the slow fermentation develops a noticeably more complex flavor in the finished bread.
Use Steam for a Crispier Crust
Professional bakers inject steam into their ovens during the first few minutes of baking to keep the surface of the dough flexible long enough for the loaf to reach its full volume before the crust sets. You can replicate this at home by placing a shallow pan of hot water on the lower rack of the oven when you put the bread in, or by misting the loaf lightly with water from a spray bottle just before closing the oven door. The result is a noticeably crisper, crackling crust with a more open crumb underneath.
Storing Your Bread
Once fully cooled, homemade bread is best stored at room temperature in a paper bag or a bread box, which allows air circulation without drying the loaf out too quickly. Plastic bags trap moisture and can make the crust go soft — fine if you prefer a softer crust, but paper is generally better for maintaining the texture. For longer storage, wrap the cooled loaf tightly in plastic wrap and then foil before freezing. Frozen homemade bread keeps well for up to three months and can be toasted directly from frozen, making it a genuinely convenient option for busy weeks.
Serving Suggestions
This bread is at its absolute best served still warm, cut into thick slices, with softened salted butter melting into the crumb. Beyond that, it works beautifully in virtually any role: as the base for a great sandwich, toasted with a drizzle of olive oil and a scatter of flaky salt, alongside a bowl of homemade soup where it can do what good bread does best — soak up every last drop of broth. It also makes exceptional toast the next morning, arguably even better than the day it was baked.
A Skill Worth Having
Learning to bake bread is one of those kitchen skills that quietly changes your relationship with food. It’s not complicated — this recipe proves that — but it does require you to slow down, pay attention, and trust a process that’s been working reliably for thousands of years. Once you’ve done it a few times, the steps become second nature, and baking a loaf becomes something you do casually on a Sunday afternoon without a second thought. That’s when it really becomes rewarding.
Fresh, warm, and made entirely by your own hands — there’s genuinely nothing quite like it. Give this recipe a try once, and there’s a very good chance the bread aisle at the supermarket stops looking as necessary as it once did.
To see the full cooking instructions, go to the next page or click the Open button (>) and don't forget to SHARE it with your friends on Facebook.